Using Continuous Integration (CI) can be very useful and worth the time of setting up even for medium sized software projects. CI is a toolset which blurs the barrier between software development and deployment. More precisely it means continuous and automatic builds, inspection and analysis of the codebase, deploy and other tasks.
For some reason CI was never really fit in the iOS developer world. The reason maybe is developers got used to XCode not really like to (and sometimes even can’t) use command line tools, and it’s not always because of the incompetence of developers. The XCode command line tools, which are not even installed by default, are second-grade citizens in the iOS world, and it doesn’t help the case of CI either. Besides that code analysing tools are hard to find for Objective-C, not like Java or other languages supported by large open communities.
Instead all of these, our goal is to build a DIY multifeatured CI infrastructure, and bring it as far as possible by documenting each step and avoiding common pitfalls during the process.
Follow-up: our post about automated integration testing on iOS using the KIF framework.
This guide should convince you of using CI, deterrention is not the goal.
The guide is also backing our lecture at Budapest New Tech Meetup on the same topic. The lecture can be watched in hungarian here.
Setting up the environment
Before going into details, let’s see the connecting components of the CI environment we are about to build! Our goal is building a system of tools with the following criteria:
-
Building iOS projects in various configurations (debug, release, testflight, etc.)
-
Static analysis of Objective-C code, calculating code quality metrics (Lines of Code, Cyclomatic Complexity, Code Duplication)
-
Setting acceptance limits for Code quality metrics
-
Running tests and evaluating the results (Unit Tests, Code Coverage)
-
Easy scaling and pluggable architecture
For achieving the goals above we’re going to use Jenkins CI in master-slave mode. The master node coordinates all of the jobs, and in the case of iOS projects, the actual building process takes place in a dedicated iOS builder slave. This partially autonomous slave does the actual tasks enlisted in the iOS job, and sends the results back to the master node. If necessary more iOS slaves can be set up and the balancing of workload is managed by the master node.
The flexibility of the system is ensured by the pluggable architecture of Jenkins. Actually all steps of a job is runned by an individual plugin.
Setting up the Master Node
Although it’s not completely necessary to build a multi-node CI architecture at first, still it’s a good idea to start with this kind of approach. Advantages of multi-node setup are plenty, and the actual setup process is almost the same as the single-node version. If you decide to build a single-node CI server at first, it’s all right. Just when following the steps of Setting up the Slave Node section, do everything in the Master Node instead. Also you can skip the section about Master-Slave connection.
Installing Jenkins
The easiest and fastest solution is downloading the official Jenkins install bundle for your OS from the official Jenkins site and installing it with default settings. For this guide we use Mac OS X and Linux, so there could be other pitfalls for other operating systems which we are not aware of. As a matter of fact after installing Jenkins, there is really not much things to do. Maybe you should check if Jenkins starts after restarting the system. After setting up the Slave Node (or continuing the Master Node setup for single-node configuration) we are going to use the master node to set up iOS jobs and installing iOS related Jenkins plugins.
Setting up the Slave node
The Slave Node executes the iOS job, step by step. Each step is initiated by the Master Node, that’s the reason the Slave Node is also known as Dumb Slave.
Hardware
For building iOS projects we need some kind of Mac hardware, with OS X version which can run the same version of XCode as you use for regular development. For this task a low-budget Mac configuration is enough. If the hardware performance becomes bottleneck it’s easy to set up a new Slave Node.
OS X settings
In the Slave Node you should create a dedicated user for Jenkins. In single-node mode and in the Master Node it is done by the installer, but in the Slave Node you should create it manually. Also Java runtime is necessary for running Jenkins.
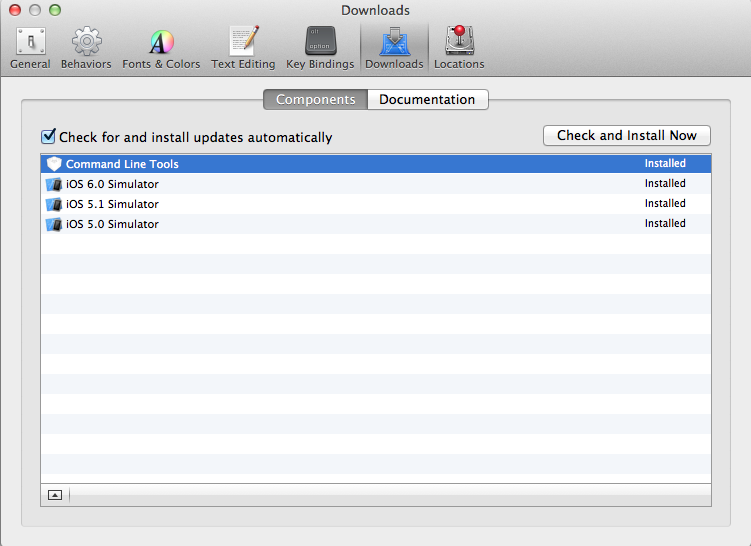
Installing and configuring developer tools
After setting up the OS, log in with Jenkins user and install XCode. After that don’t forget to download the iOS SDKs for all of our projects, also this is the time for installing XCode Command Line Tools as well. This step is absolutely necessary for building iOS project from command line and eventually from Jenkins.
Developer and distribution certificates and provisioning profiles for command line usage
It is equally important to import the developer and distributor certificates for this user with the associated key-pairs. This can be done in Keychain Access application in your regular developer environment. The task is similar with provisioning profiles – you should copy them from your machine to the Jenkins Slave.
Normally the system has to unlock the certificate and the keychain associated to them. In an interactive graphical environment this means popping up a dialog asking for permission. But in some cases (if the build process is runned by a different user, or we are using a slave node) the dialog is not shown. The build process fails because the application cannot ask for permissions.
To fix this problem you can unlock the keychain with a command line command. This is not recommended because the password has to be stored in plain text for the keychain. A better solution is to log in with Jenkins user, initiate an XCode build graphically, and if the dialog pops up, choose Always Allow.
Connection with the Master Node
By now you have a Master and a Slave Node with basic functionality. Now it’s time to connect them.
In the Master Node create a new node in Manage Jenkins > Manage Nodes.
Choose a name for the node (it should be short, and memorable, because you will using this name when you want to select this node for building a project), then select option Dumb Slave.
The # of executors should be set to the number of usable CPU cores of the Slave Node, or you just can set it to 1.
Set the Remote FS root to a directory inside Jenkins user home, Jenkins will store temporary and build files here.
You can set Labels for the node. This can be useful if you want to group nodes and refer to them. Later if you have more than one iOS slaves it can be useful, but for now leave it empty.
The Usage of the Slave should be dedicated for iOS projects so select “Leave this machine for tied jobs only”.
The last step is setting up the actual connection between Master and Slave. There are several options to obtain this, here is two simple one.
Java Web Start
The easiest solution is to use Java Web Start to connect the to systems. For this, open a browser in the Server Node and navigate to the Master Node and in the Slave Node screen click on JNLP icon and start the slave node.
The main benefit of this solution is it’s simplicity and that the master doesn’t need a direct connection to the Slave. This can be also the major drawback because the Master cannot restart the Slave once it was shut down.
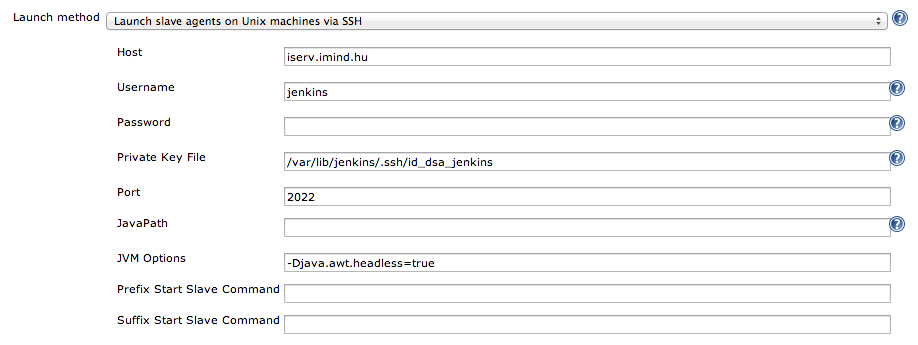
SSH
A more sophisticated way for connecting the nodes is using ssh. The Master logs into the Slave using ssh and starts the slave on-demand.
For this, enable ssh access for Jenkins user with password or a private-public keypair.
If you can see the Slave Node in the Master’s Builder Executor Status sidebar then the connection is ready to use.
Setting up an iOS job
The configured system is still not able to build iOS projects yet. For this at least we need a properly configured job and some Jenkins plugin to be installed. Besides of building the project you may need external tools for code analysing and plugins for parsing the results of these tools and providing it to jenkins.
Also it is a good idea to create a very simple iOS project with basic settings to test the Jenkins setup and also using this job as a template for later iOS jobs.
Basic job config
In the main menu create a New Job, choose free-style software project. The name you choose is the main id of the job so choose it wisely.
Restrict where this project can be run by adding the name of the iOS slave you’ve just created.
At Source Code Management set the way the project source is accessible for the Slave. Setting repository checkout strategy can help in some cases when you need a fresh checkout everytime you build.
Also you can set the trigger event which initiates the job. By default the project is built manually, but you could set it to check the repository periodically and build it every time if there is a new version.
Code analysis
After setting up the basic job properties it’s time to set up the build process. First we want to setup the source code analysis tools. These tools are usually small and need not that much resource so it’s a good idea to start running them, and if everything goes well then the longer steps can be runned as well. We set up three relatively simple tools for analysis:
Cyclomatic Complexity
This tool estimates the complexity of each source file by evaluating the program-forks in them.
The used hfcca script can be downloaded here.
Create an Execute shell buildstep with this body:
mkdir -p ${WORKSPACE}/reports
PATH=${PATH}:/usr/local/bin
hfcca14.py -X ${WORKSPACE} > ${WORKSPACE}/reports/hfcca.xml
Code Duplication
A very good and simple metric for code quality is the number of code duplications in the code base. For running this tool Java runtime is needed and the PMD java source analysis tool (download).
You also need the Objective-C language definition package for PMD: download.
After setting up the tools, create an Execute shell buildstep:
java -Xmx512m -classpath /Users/Shared/Jenkins/PMD/lib/pmd-4.2.5.jar:/Users/Shared/Jenkins/PMD/ObjCLanguage-0.0.7-SNAPSHOT.jar net.sourceforge.pmd.cpd.CPD --minimum-tokens 60 --language ObjectiveC --encoding UTF-8 --format net.sourceforge.pmd.cpd.XMLRenderer --files ${WORKSPACE} --outputfile ${WORKSPACE}/reports/cpd-output.xml
SLOCCount
The simplest metric is the line of codes tool. Download.
Execute shell buildstep:
sloccount --duplicates --wide --details ${WORKSPACE}/. | grep -v -e '.*ExternalFrameworks.*' | grep -v 'top_dir' > ${WORKSPACE}/reports/sloccount.sc
Build
The next step is building the project actually. These steps need lots of resources, so plan it wisely how many steps you need here.
XCode plugin
For building iOS projects, we use the xcodebuild plugin (which uses the xcode command line tools we installed to the slave). This plugin helps us assembling the command line arguments for building the project in a graphical interface, but you can use command line directly if you prefer it. Generally speaking you have to set the relative path of the actual workspace in the checked out repository, the target to build, or the scheme to use. You have to set the configuration and the SDK to use during the build, and you can unlock your keychain here as well (we already mentioned the importance of that)
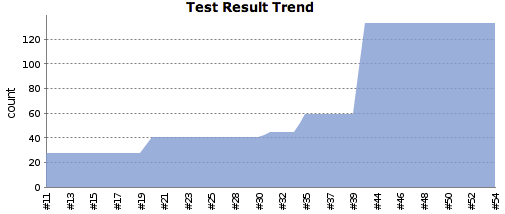
Unit Tests
You need at least one unit test in the project to use unit testing feature in Jenkins. For this create a new iOS project and choose to create target and classes for testing.
Running logic tests
For running logic tests from command line, you have to set custom build parameter in xcode plugin TEST_AFTER_BUILD to YES. Without it even if you compile and build the test target it won’t run.
For getting and parsing the test results in Jenkins, use the ocunit2junit script (download), and create a shell buildstep with the following (replace jenkinsTests with your test target)
xcodebuild -target jenkinsTests -sdk iphonesimulator -configuration Debug 2>&1 TEST_AFTER_BUILD=YES | ocunit2junit
Generating Code coverage
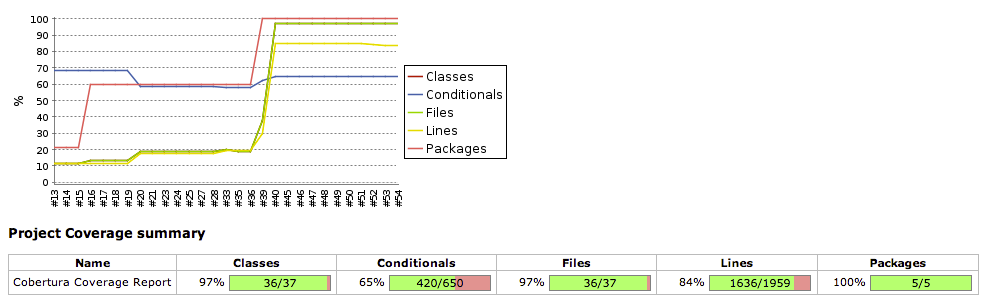
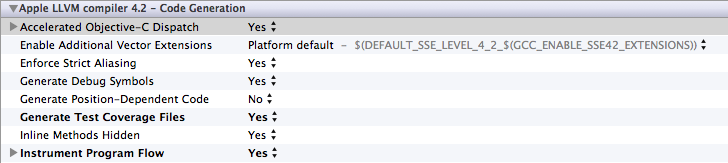
After successful testing you should create code coverage reports to have some information about the testing efforts. For this you have to modify the project settings in XCode so that it generates the coverage files as well. Set the following properties in the main target of the project (not the test target!):
Generate Test Coverage Files - YES
Instrument Program Flow - YES
After that, creat a new buildstep:
cd ${WORKSPACE}
/usr/local/bin/gcovr -r "${WORKSPACE}/" -x --exclude '.*Tests.*' --exclude '.*Libs.*' --exclude '.*ExternalFrameworks.*' --exclude '.*Platforms.*'> ${WORKSPACE}/reports/coverage.xml
Testflight
If everything went well up to this, we can try to upload the build to Testflight online ad-hoc distribution service. This makes easier the distribution of beta builds and the testers can install the new versions right from their devices. For using Testflight you have to register and download TestFlight SDK and integrate it into your project. It’s quick and painless, check for TestFlight FAQ for more info.
Incrementing the version string automatically
If you want new versions in Testflight with every build, you have to change the version number every time. There is a tool for that.
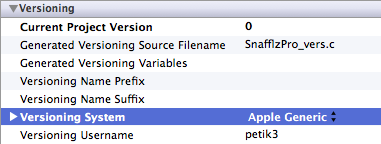
First you have to set some project settings in XCode in the build settings panel:
Versioning System - Apple Generic
Versioning Username - scm username
Current Project Version - 0
and modify project info.plist:
Bundle Version - 0
Bundle versions, string short - the main version, it won’t be changed by Jenkins
The result of this that every time there is a new Testfligth build, the bundle (build) version will be incremented by one, leaving the main version as is.
The buildstep for this:
cd ${WORKSPACE}
agvtool -usesvn bump -all
Then build the project with Release or Testflight configuratio and check in the Build IPA box. It’s also worth to note that this package has to be signed with distribution certificate, so you will need this in the Slave.
Upload
If the build went well then the created ipa archive has to be uploaded to Testflight. There is a Testflight plugin for Jenkins which can help you uploading the file, but it doesn’t have too many options to set so we decided to use a script:
IPA=$(find ${WORKSPACE} -name *.ipa)
DSYM=$(find ${WORKSPACE} -name *-dSYM.zip)
curl http://testflightapp.com/api/builds.json \
   -F file=@"${IPA}" \
   -F dsym=@"${DSYM}" \
   -F api_token='longlonglongapitoken' \
   -F team_token='longlonglongteamtoken \
   -F notes='This build was uploaded via the upload API. Check the VCS for changes.' \
   -F notify=true \
   -F distribution_lists='iMind'
Conclusion
At the end of the process what we have is a more-or-less working CI system for iOS. The most exciting part of course starts here, these steps justs try to help you kickstarting your all-purpose CI solution.
If you have any comments you can find me at peter.huszak@imind.eu or hello@imind.eu! You can also follow us for updates on twitter, or facebook. Have a nice build :)
Follow-up: our post about automated integration testing on iOS using the KIF framework.